So I created a mudroom! Yes I did! I had a closet at the entrance of our home that I hated. It was not organized or appealing at all, so...we changed it! I am so excited with how it turned out and I wanted to share how we executed this amazing project. Check it out below!
Affiliate links are used in this article
Here is the original closet
I hate those old fashion folding doors and the wired shelves I just needed to switch out.
Here are the steps and great tips to execute a mudroom transformation
Have a vision & measure! Ensure your measurements are accurate so you can purchase everything correctly.
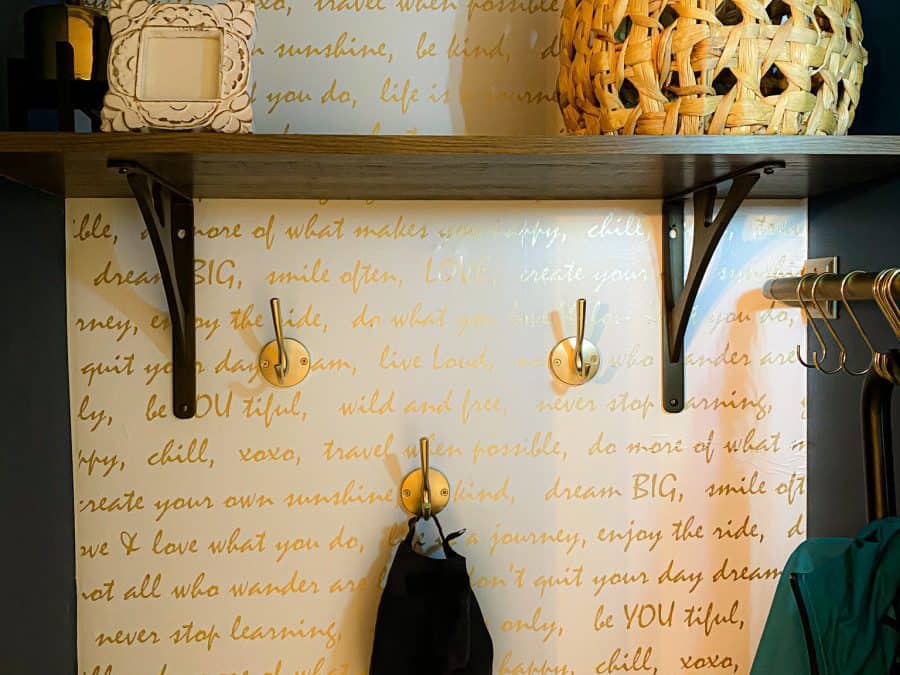
To have some great contrast either use paint or wallpaper. I prefer wallpaper to give it some more excitement. Also I used peel & stick wallpaper for this project.
I wanted uplifting quotes on the back wall and it also stuck to the color story of teal blue and gold.
3. To have seamless wallpaper application ensure you overlap the seams just a bit so it flows smoothly on the wall.
4. Ensure you have a wallpaper smoothing kit while you apply the wallpaper. It is a lifesaver!
5. At Home Depot we made sure the measure the inside and outside of the doorway in order for us to purchase the correct amount of moulding. I wanted to make sure to frame the door so it will have an amazing finish that matches the rest of the doorway.
6. Finishing nails need to be your best friend! We literally put up the moulding with finishing nails and afterwards we repainting over the nails so it camouflage perfectly.
7. I wanted to add shelving to the space for storage as well as a nice home decor display. I bought the shelf and brackets from Home Depot. The space inside the closet is 34 inches so we decided to purchase a 70+ inch shelf and cut it in half. We did this based on issues with supply and demand. I also wanted to have the shelf be at least 12 inches wide.
8. I then basically created my own bench with purchasing the Target cube storage system. I placed the unit right under the shelf that was hanging. It gives the illusion there is a bench of some sort. I love it because I now have picked up more storage space.
9. To finish off the space I added a gold curtain rod as well as gold hooks for hanging needs. I loved using gold with teal blue wallpaper, it gave the space an elegance.
10. We also added cool baskets to the space for a cool storage feel too. Last, we purchases two of these battery operated light switches. This is a great avenue if you do not have electrical that close.
So there you have it! What transformation have you done recently that was rewarding? Shop the collage below for all the materials used.
As the home trends evolve we have also seen home trends go. Here are some of the most outdated trends right now. Let me know if you agree or no?
10. Glossy wooden floors - To be honest I haven’t seen anyone with those type of floors unless it’s in a mature mature older couple home 😂 so yes that does scream outdated lol.
9. Heavy Drapes - Now I can completely agree with this one. Heavy dark beaded drapes make the room so dark!! Open up the floor by simple beautiful straight line drapes. Shop some great options. Click HERE
8. Raised bar counter - I honestly hate those too! They look old and just don’t make a lot of sense anymore. The bar counter is super high and you usually can’t touch the group when you sit. Little tough at times especially when you are short.
7. Popcorn ceilings - I am guilty of this. I’m working to remove that stuff ASAP. It just collects dust and it makes you feel you are in a 1970s/1980s home for sure.
6. Outdated paint colors in multi rooms - I am not a huge fan of a house having different color rooms unless there is a real hardcore theme or something in the room. But having a room being like green, another being yellow and the other room being pink. That multi room thing is out and so glad it is 😂
5. Bed in a Bag - I used to love these. But let’s be clear here…I mean the bed in a bag where every thing is the same print: the 4 pillows, bed skirt, comforter etc is ALL printed green and yellow plaid😂 Too much right? Lol. Check out some nice bedding options below:
4. Word Art - I always found these super cute but I’m now not into it as much. Having a broad word just isn’t enough anymore. I feel like the lettering on walls was part of the modern farmhouse concept so it was everywhere. If you have lettering on the wall it has to flow and make sense. And no I’m not talking about framed quotes etc. Check out some of my favorite framed quotes below:
3. Frosted yellow lighting - aka especially the yellow lights or just frosted bulbs all together. I hate them. I can’t see with them. They need to go if you can afford it. My life is better without them. Also yellow lights outside attract many bugs especially termites so I’m not a fan. Yellow lighting reflecting off of dark wooden furniture I just hate 😝 Shop some of my favorite lighting
2. Big Glass Blocks - I just really don’t like this anymore. You know exactly when this was installed in your home if you have one…1970s or 1980s 😂
Themed Decor - Now if it has memories and emotional attachment you can possibly get a pass. But if your house or a room is themed in fishing and your lamps are all fishing then yeah it might need to be retired lol. Or your kitchen is all cow themed it’s a bit dated. I’m not referring to a nursery. That’s where a themed decor is cool! But if you like birds and everything thing from lamps to couch has bird print…it’s time for a change.
So do you agree? Share your favorite outdated home trends!
These rolling racks. from the Container Store changed my kitchen's life!
We were having a very hard time getting our pots and pans in and out of the drawers and cabinets in our kitchen. I decided to get the chrome rolling rack system that is from the Container's Store.
Here is step by step how we got organized:
This is where I started! Pull everything out!
Measure! Measure! That was the key for me. I measured the depth, width and height of my cabinets to ensure the rolling racks I shopped for what would fit. *Another tip - if you purchase the 20" inches rolling rack, ensure your cabinet width is at least 23" inches wide. You need a little wiggle room so that your doors still close etc.
Took everything out to see what I had. I also gave away older cookware etc.
Whichever rack you purchase make sure the unit is 2" inches away from the tip of where the cabinets begins.
I purchased contact paper to go down on the bottom of the cabinet but you can also use simple grip prints.
After lay your rack inside the cabinet and pull the rack completely out. There are holes visible where the screws will go.
Ensure you use a black marker and put a dot within the hole where the screw will go into.
After that use an electric screwdriver to install the 4 screw to install the rolling rack.
And you are done! Literally. done.
See my finished product below!
It has made such a difference...Shop my cabinets below:
Girl, military families buy and always move all their appliances where ever they go! When I move I'm taking my fridge, washer & drying machine with me since we purchased them...thank you!
Adrienne
That's my best friend...lol. I love her. Meet Adrienne my longest friend in my life. We have known each other since we were potty trained, so that should tell you it's been awhile. This past weekend in August I had the opportunity to visit her and her awesome husband in their new home that they moved into about a year ago. It was a custom build where they were able to pick out every single feature (Oh I wish!).
Affiliate links are used in this article
Known this beautiful soul since I was 3 years old; follow her @adri_marie_w
So this past weekend was my first time seeing it and it did not disappoint! I discovered my best friend has the best taste when it comes to spending. She is a pro at spending high and low.
Here are the best features of their home:
The Kitchen Island - It is massive! You can easily seat 9 people and still have prep space. I absolutely loved it and the chairs she had around them were perfect as well. The granite countertops were the perfect touch with the off-white cabinets.
Check out the chairs and dupes below
2. Exceptional Living Room Furniture - I fell in love with her furniture pieces! They have Lovesac furniture which is the pieces that you can constantly move around, clean by putting the cover in the washing machine and much more. They also have the Lovesac Sac and it is so cozy and comfortable for anyone. My husband and I are considering purchasing one now. Should we?
Shop Lovesac & some dupes
3. Egg Chair & travel memorabilia - My BFF's husband is in the military so they travel all the time. And throughout their travels they collect souvenirs and display them in this adorable set up. I love the egg chair and Adrienne decorated it so well.
Shop the look below
4. High arches & ceilings - I love the openness of their home. My husband is 6'8" and low ceilings are never good. So when we entered their house the exaggerated arches and high ceilings we fell in love with. Somehow it made the space brighter in my opinion.
5. Sweet dining room set - I am not a huge fan of the table with a bench concept but my friend made me rethink it. I love her table and chairs. The table came from Ashley Furniture, the chairs were from Joss & Main and she also picked up additional chairs when she has more people over (those are from Target). Linked everything as well as dupes below:
Shop the dupes below!
So needless to say, you can have a cozy home with quality pieces! Adrienne and I have come a long way and its so rewarding to your bestie doing it big time! Proud of her and this home decor!
Are you proud of your bestie? And why? Comment below!