I had the opportunity to shadow an actual interior designer for a bit since I am very passionate about this career. For people that think interior designers do nothing but pick out tiles and paint colors are very wrong.
At the office of the interior designer I shadowed. Such a great space that shows off her personality as well as professionalism.
Here are some of the key things I learned while shadowing:
You do not need an actual degree or certification in interior design today – Yes I know this is mind blowing but it is true. You could identify yourself as the principal designer or work as a home decorator and still have your hands in the interior part. However, you still need to outsource your work or have a certified interior designer or architect in house to check your work. It is very important to have this so you can work with contractors and have a smooth working environment for yourself and your client.
It takes more psychology and relationship skills than design 60% of the time – As I was shadowing, one of the clients were upset with a contractor and Michele, who I was shadowing, had to calm them down and come up with solutions vs dwelling on the negative. It takes people skills when you are working with clients. They are emotionally attached to the project and they should be, so always remember this. Michele really did a great job to steer the conversation into becoming actionable vs a complaining session. It took a lot of patience.
Moodboards are everything in interior design. A great way to create a theme for a room or entire home/space.
Flat rates don’t work – meaning having a client pay a flat rate for your services will not benefit you in the end. In order for people to respect your time, charging hourly on extra consultations or time is needed. If not, clients will keep adding things they want to add or change and you will never be able to work on another project. That was extremely enlightening for me.
Follow-up is everything – When you do full service interior design you are working with vendors, contractors, clients and much more. This means that the follow-up and communication is key. When you are dealing with construction and contractors at times they are not on top of things (from my own experience with renovation I get it) and you as the interior designer need to follow up at all times. Then the second part is to update your clients at all times, this shows reliability and trust. It goes such a long way.
Neutral furniture can go a long way – If you buy pieces for your client that are neutral you can always update your space with a touch of colorful accessories and smaller pieces. I now live by that. Buying the bigger pieces in more subdue color palettes will make your furniture everlasting as you can use them for years to come. This is a great way to get a client to commit to something that is not over the top.
Respect the vision & budget – If you have a client with a specific vision do your best to bring it to life through mood boards and mobile design. However, if the partnership is not working do not be offended. Let the client move on. Also, respect the budget and ask what the budget is from the beginning. You do not want any surprises at. all.
I have now just a new found respect for interior designers. It’s not easy and everyone cannot do it. What piece of advice really struck you?
So I created a mudroom! Yes I did! I had a closet at the entrance of our home that I hated. It was not organized or appealing at all, so…we changed it! I am so excited with how it turned out and I wanted to share how we executed this amazing project. Check it out below!
Affiliate links are used in this article
Here is the original closet
I hate those old fashion folding doors and the wired shelves I just needed to switch out.
Here are the steps and great tips to execute a mudroom transformation
Have a vision & measure! Ensure your measurements are accurate so you can purchase everything correctly.
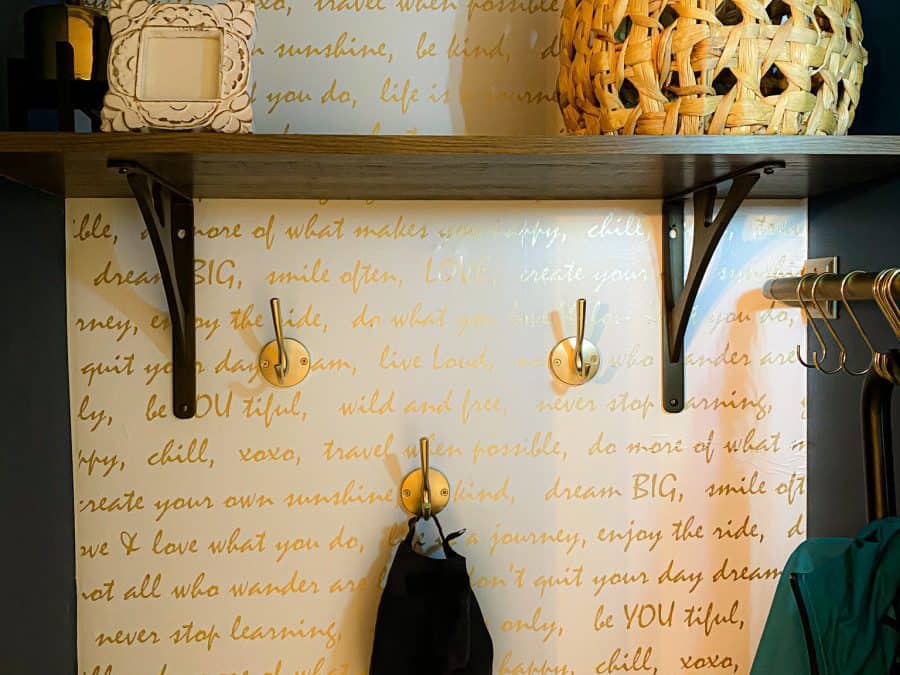
To have some great contrast either use paint or wallpaper. I prefer wallpaper to give it some more excitement. Also I used peel & stick wallpaper for this project.
I wanted uplifting quotes on the back wall and it also stuck to the color story of teal blue and gold.
3. To have seamless wallpaper application ensure you overlap the seams just a bit so it flows smoothly on the wall.
4. Ensure you have a wallpaper smoothing kit while you apply the wallpaper. It is a lifesaver!
5. At Home Depot we made sure the measure the inside and outside of the doorway in order for us to purchase the correct amount of moulding. I wanted to make sure to frame the door so it will have an amazing finish that matches the rest of the doorway.
6. Finishing nails need to be your best friend! We literally put up the moulding with finishing nails and afterwards we repainting over the nails so it camouflage perfectly.
7. I wanted to add shelving to the space for storage as well as a nice home decor display. I bought the shelf and brackets from Home Depot. The space inside the closet is 34 inches so we decided to purchase a 70+ inch shelf and cut it in half. We did this based on issues with supply and demand. I also wanted to have the shelf be at least 12 inches wide.
8. I then basically created my own bench with purchasing the Target cube storage system. I placed the unit right under the shelf that was hanging. It gives the illusion there is a bench of some sort. I love it because I now have picked up more storage space.
9. To finish off the space I added a gold curtain rod as well as gold hooks for hanging needs. I loved using gold with teal blue wallpaper, it gave the space an elegance.
10. We also added cool baskets to the space for a cool storage feel too. Last, we purchases two of these battery operated light switches. This is a great avenue if you do not have electrical that close.
So there you have it! What transformation have you done recently that was rewarding? Shop the collage below for all the materials used.
As the home trends evolve we have also seen home trends go. Here are some of the most outdated trends right now. Let me know if you agree or no?
10. Glossy wooden floors – To be honest I haven’t seen anyone with those type of floors unless it’s in a mature mature older couple home 😂 so yes that does scream outdated lol.
9. Heavy Drapes – Now I can completely agree with this one. Heavy dark beaded drapes make the room so dark!! Open up the floor by simple beautiful straight line drapes. Shop some great options. Click HERE
8. Raised bar counter – I honestly hate those too! They look old and just don’t make a lot of sense anymore. The bar counter is super high and you usually can’t touch the group when you sit. Little tough at times especially when you are short.
7. Popcorn ceilings – I am guilty of this. I’m working to remove that stuff ASAP. It just collects dust and it makes you feel you are in a 1970s/1980s home for sure.
6. Outdated paint colors in multi rooms – I am not a huge fan of a house having different color rooms unless there is a real hardcore theme or something in the room. But having a room being like green, another being yellow and the other room being pink. That multi room thing is out and so glad it is 😂
5. Bed in a Bag – I used to love these. But let’s be clear here…I mean the bed in a bag where every thing is the same print: the 4 pillows, bed skirt, comforter etc is ALL printed green and yellow plaid😂 Too much right? Lol. Check out some nice bedding options below:
4. Word Art – I always found these super cute but I’m now not into it as much. Having a broad word just isn’t enough anymore. I feel like the lettering on walls was part of the modern farmhouse concept so it was everywhere. If you have lettering on the wall it has to flow and make sense. And no I’m not talking about framed quotes etc. Check out some of my favorite framed quotes below:
3. Frosted yellow lighting – aka especially the yellow lights or just frosted bulbs all together. I hate them. I can’t see with them. They need to go if you can afford it. My life is better without them. Also yellow lights outside attract many bugs especially termites so I’m not a fan. Yellow lighting reflecting off of dark wooden furniture I just hate 😝 Shop some of my favorite lighting
2. Big Glass Blocks – I just really don’t like this anymore. You know exactly when this was installed in your home if you have one…1970s or 1980s 😂
Themed Decor – Now if it has memories and emotional attachment you can possibly get a pass. But if your house or a room is themed in fishing and your lamps are all fishing then yeah it might need to be retired lol. Or your kitchen is all cow themed it’s a bit dated. I’m not referring to a nursery. That’s where a themed decor is cool! But if you like birds and everything thing from lamps to couch has bird print…it’s time for a change.
So do you agree? Share your favorite outdated home trends!
These rolling racks. from the Container Store changed my kitchen’s life!
We were having a very hard time getting our pots and pans in and out of the drawers and cabinets in our kitchen. I decided to get the chrome rolling rack system that is from the Container’s Store.
Here is step by step how we got organized:
This is where I started! Pull everything out!
Measure! Measure! That was the key for me. I measured the depth, width and height of my cabinets to ensure the rolling racks I shopped for what would fit. *Another tip – if you purchase the 20″ inches rolling rack, ensure your cabinet width is at least 23″ inches wide. You need a little wiggle room so that your doors still close etc.
Took everything out to see what I had. I also gave away older cookware etc.
Whichever rack you purchase make sure the unit is 2″ inches away from the tip of where the cabinets begins.
I purchased contact paper to go down on the bottom of the cabinet but you can also use simple grip prints.
After lay your rack inside the cabinet and pull the rack completely out. There are holes visible where the screws will go.
Ensure you use a black marker and put a dot within the hole where the screw will go into.
After that use an electric screwdriver to install the 4 screw to install the rolling rack.
And you are done! Literally. done.
See my finished product below!
It has made such a difference…Shop my cabinets below: